


Here is a picture of each of them and some brief notes on what they are used for:
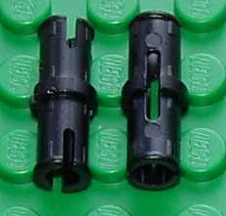
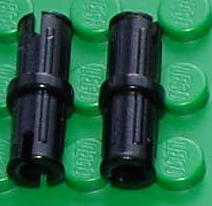
| 1) The black pegs connect various Technics components - and are quite a tight fit - so they grip nicely and resist rotation. | |
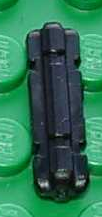
2) There are actually two subtly different versions of the black peg. This is the older kind that grips more tightly than the modern ones and can be distinguished by the ridges that run their entire length. Beware - they are notoriously hard to get out under some circumstances - which is probably why the design was changed. | |
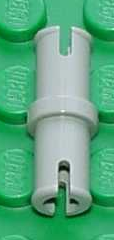
| 3) The grey pegs look identical to the black pegs at first sight - but are in fact a little smaller in diameter - so they permit free rotation of the two components that they connect. Only use a grey peg when you want rotation between the parts because otherwise it'll make your model looser and weaker. | |
4) There is a version of the grey peg with an axle on one end. These are very convenient for attaching idler gears onto beams - and also to connect components with cross-shaped holes to components with round holes. | |
| 5) This is a version of the grey peg with an ordinary brick 'stud' on one end. It's useful for mounting components with their studs at right angles to a set of holes in a beam. | |
6) The darker grey short peg looks a lot like (5) but in fact, the short end is a short peg - suitable to connecting thin beams to thick ones...or for connecting to the the holes in gears and pulleys - or to the holes in the sides of the RCX and Scout computer parts. | |
| 7) This is a longer version of the black peg that allows you to connect three beams abreast. | |
8) This is in fact like the standard (7) long black peg - but with a handle on the end. Most LEGO designs seem to use this for final assembly of large sub-modules into a finished robot. They are the only connectors that come in a wide variety of colours because the handle part is often visible in the finished design. | |
| 9) This is a short axle with a brick stud on one end. | |
10) This is an axle with a collar close to one end - it's sometimes useful because it can't slide sideways when the collar is pushed against a mounting hole. | |
| 12) This is in fact a short axle - however it's often used like a short black pin when both of the holes to be joined are cross-shaped. | |
13) There are actually two subtly different versions of the short axle. The newer ones have little notches in them. This pictrure is of the old version which was hard to remove because you couldn't get a good grip on it. | |
